1) Go for reserved Amazon EC2 instance on a long term plan ( 1 year/3 years). Choose micro instance that costs about $54 annually and a monthly recurring fee about $7.
2) Launch new instance from EC2 tab of Amazon web services customer portal.
3)Choose Basic 32-bit Amazon Linux AMI and Continue to next option.
4)

In the above screen choose Instance type as "micro". If you opted for a "Reserved Instance" make sure you select the "Availability Zone" matching the zone you selected for purchasing "Reserved Instance". Further steps in the above screen will guide you to complete the process.
5) Once your Amazon EC2 instance is up and running you have to create a keypair to allow access from SSH terminal or Putty from a windows PC.
The option in the above screen lets you create a keypair and can be downloaded locally as yourkey.pem file.
If you choose to use Putty you may find this link very useful.
http://www.keywordintellect.com/amazon-web-services/managing-an-amazon-ec2-instance-using-putty-ssh/
6) Once you launch your terminal, login as "ec2-user"
7) You need SVN server software and Apache webserver to access SVN using http.
Install Apache.
> sudo yum install httpd
> sudo service httpd start
To test the apache from your browser.
- check the public dns name of your ec2 instance. This is typically of the form ec2-xx-xx-xx-xx-xx.compute-1.amazonaws.com
You may type this url to check your running version of apache.
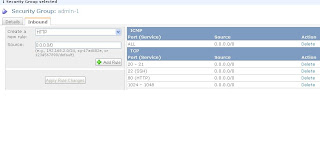
By default it is not accessible due to certain security permissions. You have to enable access using "Security Groups" under Network & Permissions.
Create a new inbound rule as shown in the following picture. Choose HTTP as a New rule using the tab "Inbound".

Access the Apache server with the URL mentioned in the beginning of this step 7.
8) SVN setup
Detailed step given in the link below.


Comments
Post a Comment